





By Ken Ward
Most of us can’t sell great sound in cars. This is because most of us in the car-audio business today aren’t familiar with great sound anywhere. We don’t have a reference.
We probably don’t see live music much (which is a shame).
We probably don’t have a good home audio system (and whether it’s good or not, we probably don’t get much time with it).
We probably don’t even have a great set of headphones (headphones are good for tonality, but the spatial presentation from headphones is really limited – read on for more).
So, how do we sell great sound, if we don’t know great sound? It really has elements of a chicken-and-egg problem.
It helps if you break “great sound” into two aspects – the frequency response, and the spatial performance. Stereo recordings allow the listener to hear the intended placement of various performers on an imaginary stage, with the intent belonging to the recording engineer.
Some of us have seen the movie “Bohemian Rhapsody” (and nearly all of us have heard the hit song!). The movie contains a scene in the studio, where the various performers and the recording engineer worked to create the song as we know it. It was assembled from several tracks, each containing a single performer’s music – in the film, it seems as if no two musicians are ever in the room at the same time! The illusion of location in the stereo recording was the creation of Roy Thomas Baker (the producer and engineer), engineers Mike Stone, Gary Lyons and Geoff Workman, and the assistant mix engineer Gary Langan – who was just 18 at the time! (For more on this famous 1975 recording session, read Mark Cunningham’s interview in Sound on Sound, here.)
So while stereo is intended to create the illusion of a performance on a stage, most popular recordings which enable that illusion do so from whole cloth – live recordings with a single set of mics, without post-processing, are pretty rare. So how do we know what we’re supposed to hear in the spatial presentation? How do we know if the sound system is giving us good imaging, if we don’t know what the recording engineer intended?
Here’s how I do it – this five-step process presumes you have two home stereo speakers and a system to play them with. The first two steps can be done on their own, with a break after – and the next two steps can be done on their own, with a break after, as well. However, I don’t recommend doing these out of order, and I don’t recommend changing anything in your system until you’ve done them all.
Step 1: Define imaging
Let’s start out by stipulating that stereo performance is separate and distinct from frequency response and tonality. Good stereo doesn’t always mean good sound – we should learn about them separately, and learn to evaluate them separately.
I recommend using the Educar Test Tune app (available for iOS here, and for Android again soon). These tracks are also available on the test CD included with the Audiofrog UMI-1 measurement microphone kit.
Figure 1 – Educar Test Tune for iOS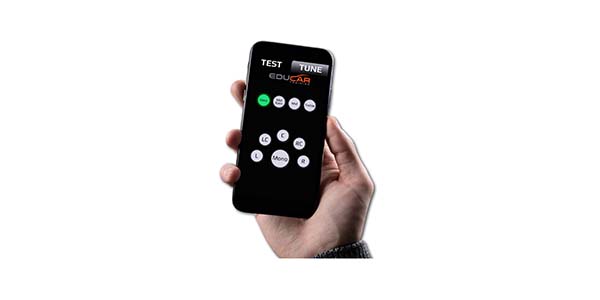
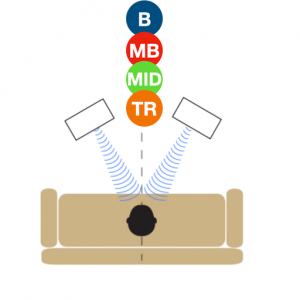
Listening to a home stereo system, learn to place each of the nine tones on the Tune tab. Left, Left Center, Center, Right Center, Right should be properly placed. Bass should be up front (if the home system you are using has a subwoofer, the bass should still be up front!), and Midbass, Midrange, and Treble should all be centered between the left and right speakers.
With a home stereo system, this should be really simple, as long as you sit in the correct spot, and you don’t have any severe hearing damage (if you have partial hearing loss in one ear, this still works, but everything will be off to one side a bit).
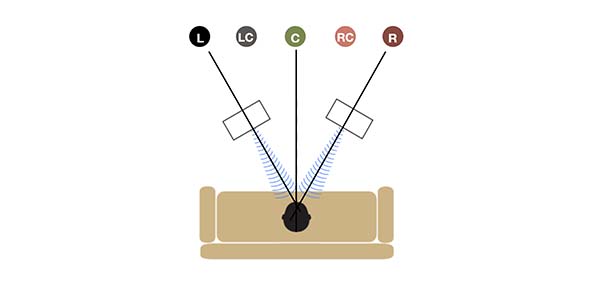
Figure 2 – Using the Five Panned Pink Noise Tracks at home
Figure 3 – Using the Four Segmented Pink Noise Tracks at home
Now, you have an imaging reference, for speakers (headphones can only place things between your ears for the most part, apart from head-tracking systems). A good car-audio system should sound like this, too – but it’s so rare that it actually does, that you should start with the home. (And not with headphones, either, since they really don’t image in front of you).
For the purposes of this discussion, we are talking about the basic stereo imaging test in the Educar smartphone application. Some home audiophiles may now be itching bring up the concepts of sound extending beyond the speakers, or of depth, or of something else, but for the moment we are going to limit our conversation to this basic stereo imaging test.
Does your home audio system perform well in these tests? Is the bass up front? Is everything centered that should be centered?
If you try this test with a surround-sound system, or a sound bar, which mode you use to drive the speaker system is crucial – I’d just use “stereo”.
If everything seems right, for extra credit, get to one of your stereo speakers and swap the (+) and (-) wires temporarily. Watch how some things collapse. The center is now everywhere but the center! (If that’s what you heard at first, then you already had one speaker connected backwards, of course.)
Now that you’ve verified that your system is a stereo system, and has acceptable stereo performance, you can listen to music.
Step 2: Listen to some well-recorded stereo music on that home audio system.
I’ve done my best to include some of everything, since everyone swears “I listen to all kinds of music”!
Recommended Tracks (also available on Tidal in a playlist) :
- Rickie Lee Jones, Chuck E’s In Love, Easy Money, self-titled album. Easy Money will challenge your system’s ability to play bass, while Chuck E’s in Love is just fun.
- Pink Floyd, Is There Anybody Out There?, The Wall (2011 remastered version).
- Aimee Mann, You’re With Stupid Now (Album Version), I’m with Stupid. Two performers, both playing at different times, both singing at different times, clearly standing on different locations in the stage.
- Norah Jones, Cold, Cold Heart (Live), ’Til We Meet Again. The piano is excellently miked, and she is not – she almost seems obscured by the piano in the room – but the room sound is great.
- Lyle Lovett, Church, Joshua Judges Ruth. Worth the six minutes, and worth playing with some volume.
- Joshua Redman, Hide and Seek, Freedom in the Groove. A lovely, lovely sound, with the performer clearly located.
- Ani DiFranco, Beautiful Night, Revelling/Reckoning. Long, layered, complex introduction, with answering-machine samples the only “lyrics”, and exaggerated panned stereo imaging which nonetheless is perfect for our goal here.
- Pink Floyd, Money, The Dark Side of the Moon. More special effects, rather than basic stereo reproduction, but a good yardstick.
What did you notice? Who was where?
Part Two – Frequency Response
Part One addressed evaluating stereo imaging performance. Now we will talk about quantifying the frequency response of a system.
Step 3: Defining frequency response.
Play mono pink noise and check the frequency response at your listening position. Use 1/3-octave analysis – no higher – and using your phone and phone mic is fine for this test. For iOS, I like Octave RTA (available here). Avoid Bluetooth playback if you can, since treble rolloff is a part of most Bluetooth playback.
Don’t try to do anything about it! This isn’t a tuning exercise, and jumping into tuning an EQ without proper introductions can be a big waste of time.
How linear is it? How does it compare to our target curves (which are different in the home, but are still fairly linear)?
Here’s an approximation of the Muller Curve, derived from many tests of high-fidelity listening rooms conducted in the 1970’s. This was about 3dB up in the bass and about 3dB down in the treble. How does your measurement compare?

Figure 5 – The Muller Curve, defined by Bruel and Kjaer in the 1970’s
Step 4: Listen to some more well-recorded music on that home audio system.
The above tracks work, but here are some more (again, a playlist on Tidal is available):
- Black Eyed Peas, Boom Boom Pow, The E.N.D. Great bass, with texture and variety.
- Bruno Mars, That’s What I Like, 24K Magic. Good dynamics, lively, fun, mildly risqué.
- E.M, Low, Out Of Time (25th Anniversary Edition remaster). 1000 times better than the original.
- Corporation, Jack White, Boarding House Reach. Good rock song, complex, with White’s trademark sound.
- Richard Goode, Beethoven Sonata #21 in C Major, Beethoven: The Complete Sonatas. Again, worth the 6 (+) minutes. Most of us don’t listen to classical, and this album is a great starting point. I now have three Richard Goode Beethoven albums downloaded and listen to them often.
- Steely Dan, Morph the Cat, self-titled album. Great bass.
- Diana Krall, A Case of You (Live), Live in Paris. Wonderful version of the Joni Mitchell song, great piano notes.
What did you notice?
Step 5: Perform the above four steps on any car-audio system you like.
Test the imaging with the Educar app. How did the system do?
Note what’s different.
Is the center in the center? Is LC in front of you when you’re in the driver’s seat?

Figure 6 – Using the Panned Pink Noise Tracks in a car
Is the bass up front? (Bass height is not critical during this test, the other three should be all on top of each other.) Is the midbass or midrange split apart? Is the midbass, midrange, or treble off-center?

Figure 7 – Using the Segmented Pink Noise tracks in a car
Can the midbass speakers handle the energy from all these tracks? Can the bass speakers? What about the piano notes? How do they sound? What comes up short?
What’s the frequency response overall like? Here’s a good response for a car (the bass level may be very different):

Figure 8 – a target response curve for a car
Conclusion
Once you’ve performed the first two steps, imaging as a topic should be a lot less mysterious, and imaging in a car should be understood to be something that never works well on accident. It takes a lot of work to make a car audio system image well in the driver’s seat.
Once you’ve performed the second two steps, the concept of an overall response affecting the tonal signature of any speaker system should be clear, and you may be ready to start making improvements (trust me, a phone and an app are not enough to start making real improvements – in a future article we will talk about how to get started!)
Ken Ward is an industry veteran of over 30 years, and specializes in the use of DSP tools in cars. He serves as International Technical Marketing Manager for Elettromedia s.p.a., parent company of the Audison and Hertz brands, and also manages the Educar online community (which focuses on acoustics and OEM integration for car audio). Along with years in retail and co-founding Musicar Northwest, he has worked in product development and planning in the car audio, security and remote start, telematics, and in-car entertainment categories. He lives in Portland, Oregon.



Great article Ken. I have to argue with your vehicle image diagram though….HAHAHA
Once I seen Ken’s name in it I had to click it, click bait well well worth the read. Great job on the explanation.
Great read! I agree with Barry this should be required reading. Good job Ken and Amy!
As soon as I saw it was Ken Ward, I knew it was going to be long. X-D
Great detailed write-up, Ken!
If a reader needs access to a good home setup, you can visit a decent home audio store or custom home integrator and ask if you can use their setup for a bit. If you explain why and what you are trying to learn, they will probably be excited to help.
Excellent article. Should be required reading